Slumming with an iPhone

Having a steady diet of medium format cameras from Hasselblad to Mamiya, shooting anything less felt like I wasn't taking the craft seriously. Shooting in 35mm I felt compensated a bit with the heft of a pair of Nikon F3s and an array of fixed focal length lenses. Neither format suited well the glove box or tank bag. They seem to prefer (or how I justified it given the investment) Pelican cases and Magliners to get there.

But as the saying goes, the best camera is the one you have with you. An imaging generation ago that meant an Olympus XA, the size and shape of a two-week old bar of Irish Spring that shot 35mm loads with a 2.8 aperture and 35mm focal length. Images were incredibly sharp with Zuiko ground glass in arguably the smallest full-frame 35mm camera ever made.

Today the XA's only drawbacks are you can't text nor can you pay for your Starbucks Pumpkin Spice latte with it. Okay, and you can't upload your Camera+ app-enhanced pics to Facebook either.

The sound you're about to hear is the collective exasperation of all my photographer friends when I claim that my iPhone 4 meets almost all of my needs as a photographer. And I can say that after releasing the shutter of my Canon digital SLR over ten thousand times.

Eyes are rolling.

I've been shooting my iPhone exclusively for the past five months and have learned to have it become second-nature to me as much as an extension of my mind's eye as any SLR or rangefinder before it. And I learned a few things along the way.

It's always with me.

Motorcycle, kayak, road bike, trail, ocean, tarmac. I don't need rain gear, a military grade impact case or a Gitzo, though I have pressed my luck a time or two with the elements. Regardless, it's always with me.

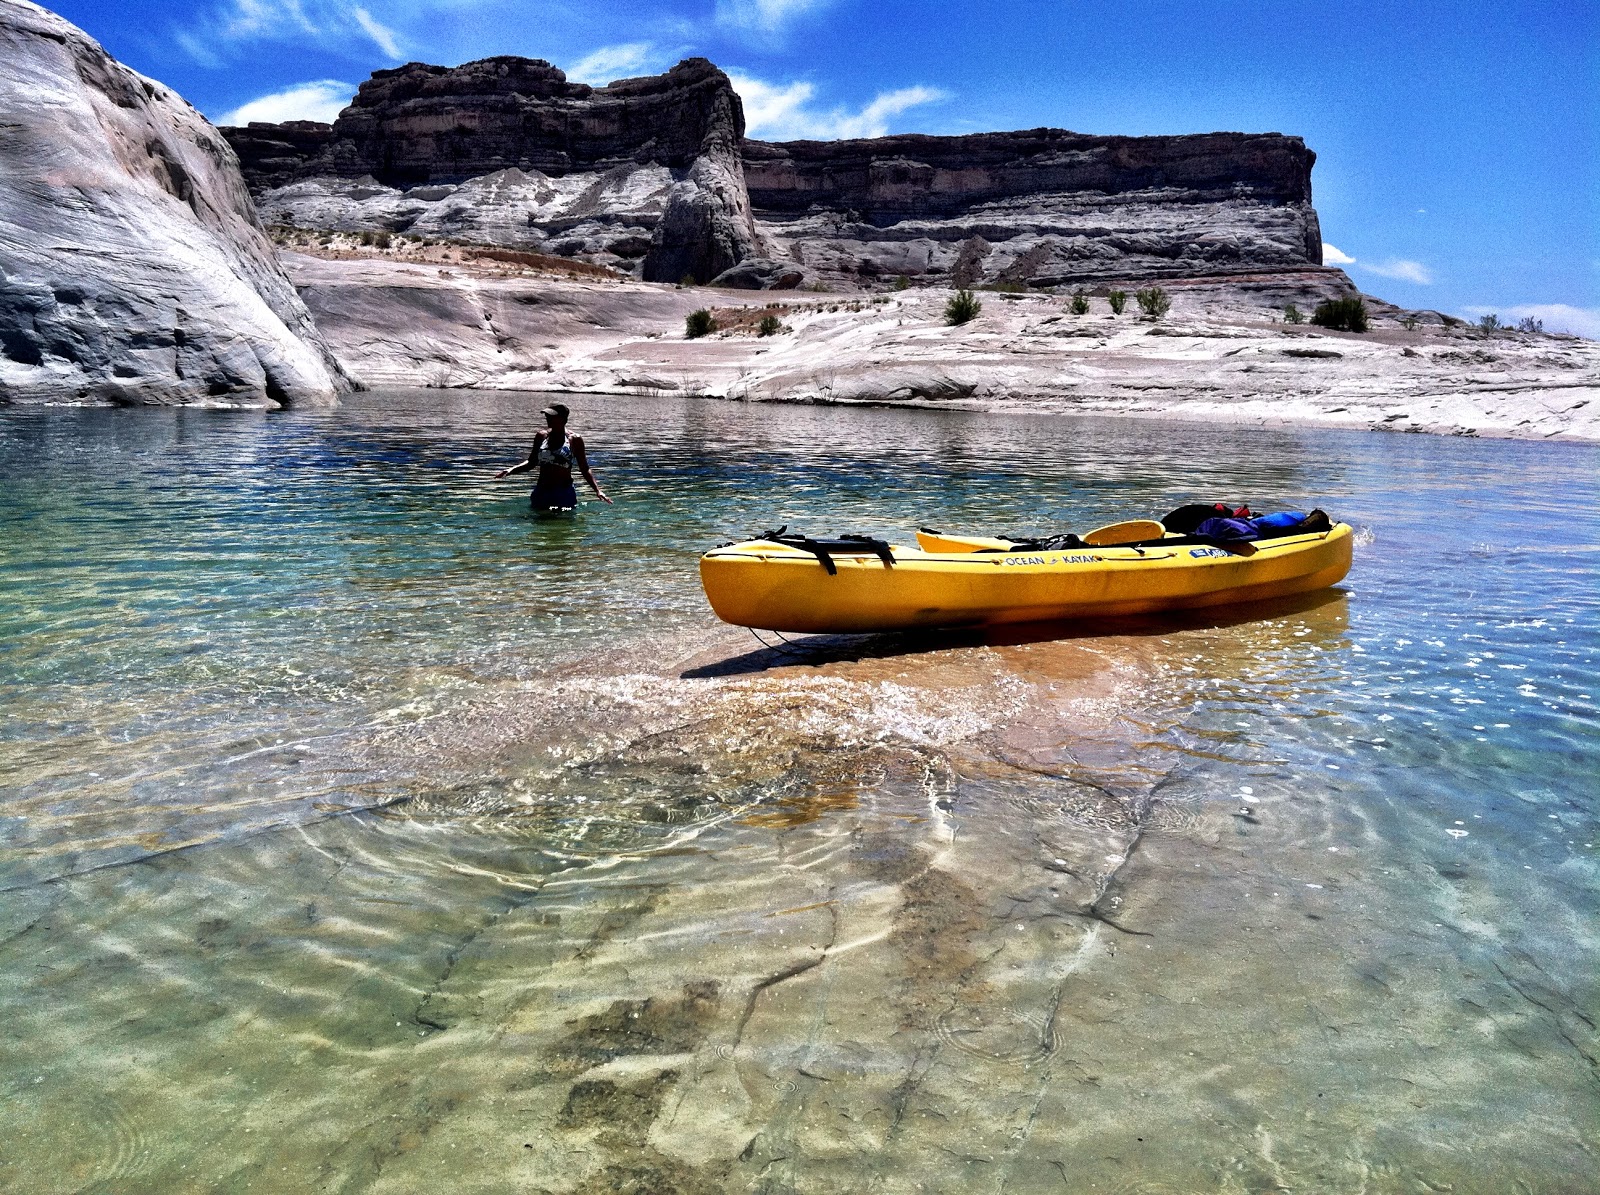
When you're living off of a sixteen-foot kayak, space and convenience trump pixels and fast lenses, so I left the camera gear behind on our latest Glen Canyon excursion (felt like leaving a loved one behind) and tucked the iPhone into my porous day bag to be easily retrieved along the way.

The bag took the brunt of paddle drips and splashes and had I swamped the craft I'd be sunk, or rather the iPhone would be. But risks averted, the Swiss-army camera captured highlight and shadow detail-rich images. Granted, full sun certainly helps the 1/3.2, five mega pixel sensor.


It waits for me.

Release the shutter on any camera and you wait, albeit unmeasurable by your second-hand. A mirror has to fold up, a shutter has to move our of the way and emulsion has to be exposed while you wait. The iPhone waits for me to remove my shutter-releasing digit from its button, allowing tighter anticipation times, pre-focus and exposure. Anyone who's ever shot a child or dog in action knows the frustration of shutter release lag.

Annie loves to hang out at the ranch. She has this perpetual sloppy dog-grin unaffected by manure and flies. I wanted to grab that, controlling the precise time to release the shutter, so I held on until I managed the frame into the proximity that would exaggerate her smile... and released.

This is by far her favorite picture.

This also requires the photographer to hold the iPhone with both hands, increasing stability and reducing propensity to drop the device amongst the road apples.


It gets me close.

If you have a discerning eye and can do math (leaving out most COMM students) you know darn well the macro-esque lasagna shot above has been digitally tweaked. If not, though, you just might want a bite of this multi-layered sensation thanks to the Camera+ app from Tap, Tap, Tap.

The iPhone lets you close but it's Camera+'s tools that let you get intimate. For this shot I used Clarity that pulls detail out of both highlights and shadows and bumps chroma and crushes blacks enough create amazing contrast and color saturation without looking processed. This feature alone is worth the $1.99 iTunes charge for the Camera+ application. I also used the Miniturize effect to produce the shallow depth-of-field illusion.

This is the same image without the Camera+ tweaks:


Another tool in Camera+'s box is a floating auto-focus and exposure lock icon on the rule of thirds grid in its interface. Tap and drag to fix focus in a certain area, tap again to break out the spot exposure and drag it into shadows to punch the highlights and vice/versa, and voila. Try doing that with the ground glass on your Blad. 


It shoots from the hip.

The iPhone is as inconspicuous as high tech devices get, allowing the focal plane to go beyond the eyeline. High, low, canted introduce perspectives beyond the 5'6" syndrome and when eye is away from the frame in composing, you develop a sense of proximity and frame through lots of practice, and your pics turn out like a box of chocolates.

You never know what you're gonna get.

I had both iPhone and digital SLR slung over my shoulder at the WomenRock Triathlon. I have a terrific 10-22 short zoom that allows me to shoot seemingly indiscriminately and still end up with a usable take. The iPhone's 3.85mm focal length, the same as almost 30mm for thirty five, promotes the same freedom of perspective while ensuring inclusion of content. So while aiming for the number plaque on my wife's road bike and hoping I got the background for context, I was rewarded with this mix.

And I was lucky.


It begs the frame.

Zoom lenses are handy, but they're spoilers more so. If you don't like what the frame is giving, rotate the barrel and change your focal length. You don't have to move to get the composition, compromising truer compositional forces along the way. 

Any fixed focal range finder makes you move, closer, father, higher, lower to get the frame where your discerning eye sees the golden mean, the power of line, the gestalt of context, but you're still limited to that tiny little parallax-corrected view finder. 

The iPhone has a hella big view finder in 5:4 freeing up the eye to move as if it would on the print, recognizing, at least for my eye, new combinations of principled composition with avant garde influences. I think that means that it makes it easier to bend if not break a few compositional rules. 

It also allows the eye to see in shadows and highlights, recognize the influence of texture, pulling something interesting out of what the naked eye might see as mundane. 


Yes, I know. I can't blow these up huge and the resolution isn't commercial, and its sensor is no better than middle-of-the-road point-and-shoots. But I can shoot, edit, and post from my palm faster than you can say Hasselblad-Mamiya-Nikon-Olympus-Pelican-Magliners. 

Almost. 

Final Rubric

All Outcomes for this class are considered. 

Create and Maintain a Blog - 100 points
You've established and designed a blog that represents your content and personality using template and format resources. You've included a blogroll of other blogs in an effort to establish identity and draw more readers. 

Incubating                    Hatching                    Weaning                    Flying
      1-24                           25-59                         60-79                      80-100


Read Blogs - 100 points

You've created a blogroll that chronicles what you read daily. 

Incubating                    Hatching                    Weaning                    Flying
      1-24                           25-59                         60-79                      80-100


Podcast - 100 points extra credit
You've acquired audio data including an interview and nat sound that supports the context of your story, conducted your interview resulting in complete sentences and sound bites to avoid editing out of context. You've edited your podcast using nat sound mixed in a second channel in a cogent podcast not to exceed two minutes. You've posted your podcast to your blog. 

1-100 points

Digital Photojournalism
You've shot a minimum of three images that amplify and support your story's content and provide context for the theme of your writing, using compositional influences including the rule of thirds and the draw of the frame.

    1-9               10-17             18-24                   25-30
Amateur         Novice      Accomplished       Professional

You've edited and enhanced your photography for clarity and aesthetics.

1-9               10-17             18-24                   25-30
Amateur         Novice      Accomplished       Professional

You've integrated your images into your written story on your blog.

1-13               14-25             26-34                   35-40
Amateur         Novice      Accomplished       Professional


Slide Show - 200 points
You've shot a take of images and have edited them to tell a story with continuity, establishing context and flow.

    1-24            25-49            50-74                  75-100   
Amateur        Novice     Accomplished       Professional

You've created a slideshow with these images and have posted the show within your blog. 

 1-24            25-49            50-74                  75-100   
Amateur        Novice     Accomplished       Professional


Moving Pictures - 200 points
You've acquired well-composed and exposed video with coverage to give you establishing, long and medium shots, close-ups and extreme closeups to tell your story. 

    1-24            25-49            50-74                  75-100   
Amateur        Novice     Accomplished       Professional

You've edited a package, sweetened audio and have exported and published your video to your blog. 

 1-24            25-49            50-74                  75-100   
Amateur        Novice     Accomplished       Professional


Analytics - 100 points
You've gathered data depending on the metrics you've selected and have been able to determine you're blog's popularity. 
    1-24            25-49            50-74                  75-100   
Amateur        Novice     Accomplished       Professional

Adding Google Analytics to Your Blog


1. Create an account by going to Google Analytics and follow the prompts.

2. Click on 'Add New Account' or 'Add Website Profile.'


3. In the box add the URL for your blog.

4. Set your Country and time zone, hit continue. Enter your name and agree to terms. The Tracking Instructions page will load.


5. Find and highlight the tracking code and copy.


6. In a new window, sign into Blogger. Click 'Design,' then click on 'Edit HTML'


Back up your template by clicking 'Download Full Template' just to be safe.

7. Scroll to the bottom and paste the code you copied from Google Analytics just before the closing 'body' tag.

8. Save template.

9. In your Google Analytics window, click 'Check Status' or 'Verify Tracking Code' under the Status column.  Once verified, the status will change to 'Receiving Data.'

The Scent of a Woman: Editing techniques

Cutting on the Action
Cut matching action from one shot to the next. When Frank rises from his seat we see him initiate the move and the shot cuts to a wider establish while he's still moving.

Sight Lines
The 180 degree rule. Donna opposite Frank establishes the site line. Charlie simply adds an additional trajectory.

Motivated Edits
When Donna looks to Charlie to see if Frank can be trusted, the shot naturally cuts to Charlie for his reaction.


Screen Direction
Exiting and entering frame in continuity, subject moves in the same direction on screen. Notice the direction of the Ferrari.

Pacing
Setting the tempo of the sequence. As Frank drives the Ferrari faster the pacing of the edit accelerates.


Illusion of Continuity
Compresses real time on the screen and progresses the story.


Editing on iPhone

August, 2008 I posted this as part of the launch of the converged journalism track that I was developing. The iPhone was still an emerging concept at the time with no video capabilities.

We've come a long way in three years. Now all this can be done with the iPhone.

Editing with iMovie on your iPhone
Acquire your clips. Careful with overruns, aimlessly rolling footage. With a little pre-production planning you can keep your shots and take to a minimum and still get the coverage you need to tell your story.

Launch the iMovie App
t's $4.99 on from Apple's App store. Start a new projected by tapping the plus sign.

Select a Theme
A selection of themes appears, preset editing contexts with effects, titles and custom music. You'll have a choice as to whether to include the music.


Edit
Your clips appear appear on the timelime. Drag your finger across the canvas to scroll or scrub the clip and play from that point. The timeline can be magnified or shrunk with two fingers by pinching and zooming, compressing the timeline for ease of editing longer clips.

To shorten clips, tap the clip in the timeline and two yellow handles appear. click and drag the handles at in and out points to adjust the clip's duration.

Remove the clip by tapping and holding and then lifting the clip out of the timeline.

Double tapping the clip enables adding titles, assigning a locations and disabling the audio.

Insert
Tapping the insert icon enables importing additional video, stills and audio to your timeline. TO add a photo, tap, Photo. Your camera roll appears.


Tap the image you want and it appears in your timeline where you've left your cursor. Your pic defaults to a customizable Ken Burn effects that pushes and crawls over the photo, a great tool for packages and docs. Adjust the pic's duration as you would a video clip.


NLE
Piece of cake here. Just tap and drag your clips to the desired point on the timeline.

Transitions
Icons representing transitions appear between clips. Double clicking brings up transitions options including cuts, dissolves and fades, or theme specific transitions. Careful here to not get caught up in the effects. Transitions times can be adjusted.


Titles
Each theme comes with its own typography design that you can add anywhere on your timeline.


Find more tips and tricks.

Better Practices in Shooting iPhone Video

It feels almost ridiculous to shoot video with an iPhone, and I write this with the caveat that iPhone video has far to go, though much distance is covered with the new 4S. Reasonable, even pleasing results can be had with the "old" 4 with a little help from these friendly practices.


Stabilize
While the temptation is irresistible to hold your iPhone (or any video acquiring device), it's critical to give it a solid place to shoot, even if you're moving it around or going for the all too prolific NYPD Blue floating frame. Even that's been stabilized.

Mounts for your iPhone aren't as hard to come by as they may seem. Visit any auto parts store and you can find a mount for your device with which a little ingenuity and some duct tape can convert it into a tripod mount. A table, a sandbag, a fender, a rock, a spring clamp, you're surrounded by stability. The iPhone 4S has image stabilization. Any image stabilization sucks power.

Clarify
No app, no non-linear tool, nothing can compensate for obscurity except your careful eye. Something that's a bit more fundamental to stay on top of if you're pulling focus with the right apparatus, but all you have to work with on your iPhone is its auto focus feature.


It's one that may test your patience, but the payoff of clarity is worth it. When the camera is recording you can navigate what's in focus by tapping on the screen. The square that appears indicates the area wherein focus is pulled along with exposure and color balance. This is especially critical in macro-type shooting, where your iPhone lens can pull focus just beyond three inches.

It's critical to remember while you're shooting to tap-tap often when your focal distance changes, when your light changes from one color temperature to another, and when your exposure changes, even a little one or two-stop difference going from the shrubs to the the trees. Watch carefully for focus, color temperature and exposure continuity, which is tough to do since iPhone video offers no standard, no f-stops, no focal distances to go by.

It's been kind of nice, though, not to have to worry about all those numbers, trusting the eye instead.

More pixels means more clarity as well, and more can be had with the iPhone 4S, graduating from 780i to 1080p.


Expose
Back in the day Canon introduced an exposure feature that followed the pupil of the photographer's eye while it tracks the subject in the view finder. Autofocus and and exposure would follow suit, adjusting for where the eye would land. iPhone follows your finger instead. While rolling, track the AF square to the area for which you wan tot expose and watch the adjustment happen before your eyes. Use this tool to pull detail our of highlights or shadows.


I've put the AF square over the shrub and tapped twice to pull focus and exposure in that area. See while I'm able to bring out detail in the shadows, I've compromised my exposure in the rest of the frame. 


By tapping on an element that will give the most medium value in exposure, such as the trunk of the tree...


...the exposure compensates and the color temperature balances as well.


Touching on the sky, the brightest part of the composition shifts exposure beyond, trying to find detail in the highlights, losing most detail in the shadows.

Exposure is a balance and while there may be ways to tweak poor exposure in post production, nothing makes production cleaner and more aesthetic than getting it right the first time.


Horizontal
What may be a foregone conclusion for photographers is something that needs to be said to iPhone shooters who have the habit of shooting stills vertically. Rotate ninety degrees, please. Think horizontal. Think film aspect ratio.

This.

Not this.


Cover
Know your context, it will dictate your coverage. Coverage is the photography you capture to tell the story with perspective. Coverage consists of shots; establishing, long, medium, follows, cut-aways, close-ups, extreme close-ups.


Move
Want to move the film plane? Check this out:


Illuminate
Light is cheap. It's everywhere, especially during the day. iPhone video loves light, lots of it. The principles discussed in my post Light Defines Form all apply.


Frame
I wrote in Slumming with an iPhone, "Zoom lenses are handy, but they're spoilers more so. If you don't like what the frame is giving, rotate the barrel and change your focal length. You don't have to move to get the composition, compromising truer compositional forces along the way. 

"Any fixed focal range finder makes you move, closer, father, higher, lower to get the frame where your discerning eye sees the golden mean, the power of line, the gestalt of context, but you're still limited to that tiny little parallax-corrected view finder. 

The iPhone has a hella big view finder in 5:4 freeing up the eye to move as if it would on the print, recognizing, at least for my eye, new combinations of principled composition with avant garde influences. I think that means that it makes it easier to bend if not break a few compositional rules. 

It also allows the eye to see in shadows and highlights, recognize the influence of texture, pulling something interesting out of what the naked eye might see as mundane." 

Digital Image Management

Long gone are the days of celluloid when it comes to image storage. In fact, film wasn't a storage medium, it was the medium. Slide trays and archive quality plastic sheets were they way one once file away images.

Then we went digital.

Now long gone are the days of disks and drives. Digital imaging created a monster problem, where to put all these images. When I was shooting film I was conservative, with typical shot rations of 4:1, but digital blew wide open. Besides ratios three times that, I'm shooting more subjects, taking more risks in exposure, with over ten thousand images uploaded in the past three years.

Where to put all this data? In the cloud.


Light Defines Form: Modeling the Face

Light defines form. Move light's sources, or move the form and you change the modeling of the form by moving shadow. The quality of the light defines the falloff of the shadow. These two ideas combine to create modeling, and the oldest and for me the most enjoyable form to model and capture is the human face.

My photographic preference is in soft shadows with strong contrast maintaining detail across the exposure. I use this preference to model faces into three classic forms; the Rembrandt, the split, and the glamour.


The Rembrandt is characterized by the triangle of light on the shadow side of the face created by the shadow from the nose and the shadow falloff of the cheek bone. This one of Matt is dramatic, with a high shadow to highlight detail. Were the key lamp any farther camera right, this would end up in a split.


Like this. I had Ben turn his head just enough to gather the catchlight in his left eye. His cheek is barely revealing some ambient light, not quite enough to qualify as a Rembrandt. The split is characterized by dividing or splitting the face with the key at a ninety degree angle to the face.


Look at Whitney's eyes and you'll see the glamour set-up in the catch lights. The key lamp is diffused and above her and the fill is a bounce fill from below. A subtle short loop shadow is formed just below her nose and the falloff of shadow on her cheek bones compliments her extraordinary facial structure.

These styles are easy to come by with studio fixtures and a digital SLR, but this class is geared toward reaching similar results with less inventory, using existing light and perhaps the most accessible camera to most of us, the camera phone.

This is Courtney. She was gracious enough to model for our class lab.


It was a little after 11:00a, the sky was clear, the sun high, not the best conditions to be shooting portraiture, especially with an iPhone. 

She was in the shade in this shot which gives her an even exposure across her face, but in order to get a good exposure, the background washes out to over exposure. Nothing critical, just one of those photographic tradeoffs. To add a little kick in modeling Courtney's face, we added bounced sunlight from a flex fill.


This created a Rembrandt shadow on her right cheek, defining or modeling her face a bit better. But the image is still problematic in that the iPhone's 35mm-equivalent wide angle lens distorts Courtney's face, aggrandizing her forehead and nose.

We then created a glamour look, modeling her face again using existing sun light. With her back to the high sun which framed her head and shoulders in a halo, a flex fill was used as a main above her, reflecting sunlight to her face from above. A second bounce device was used to fill from below creating, I'm guessing here, a 1.5:1 ratio of key to fill. 


These ratios are determined be the distance of the flex fill to the subject, or by varying the flex fill's luminance by using its alternate softer side to reflect light. 

Pulled into proper distances, the key bounce and the fill bounce produce light in range (about four stops) of the backlight. And by zooming the focal length by 1.5X, we got a bit away from distorting Courtney's features. 


I've dropped the chroma here and added a depth of field effect with the Camera+ app on my iPhone, but the image still isn't right. I need to compress the focal length a bit more by going 2X. 


That's better. Her face now flattered in proportion, about a 3:1 split of backlight to face highlights, and we've come up with a dramatic portrait. I'd drop that handrail in the background through depth of field, but one of Camera+'s shortcomings is the inability to layer effects.

Gliding Glen Canyon

CalCot

On Assignment

Ten p.m. the night before, my cell rings. The number is that of a producer I work with in San Francisco. He's asking if I could be in a small town south of Fresno before sunrise to shoot a cotton harvest. The best directions he could give me were GPS coordinates, six hundred miles away.